Saving Pumpkin Seeds: A Gardener's Delight
There's a certain magic in watching a tiny seed grow into a sprawling vine that eventually yields a magnificent pumpkin. But the magic doesn't have to end when you've carved your jack-o'-lantern or baked your pie. Saving pumpkin seeds is a rewarding practice that connects you to the cycle of the harvest and ensures you can grow your favorite varieties year after year. It’s a simple process, and understanding how to pick the perfect pumpkin for carving (and eating!) is the first step to a successful seed-saving endeavor. Let's dive into the straightforward steps of how to save pumpkin seeds.
Why Save Your Own Pumpkin Seeds?
The benefits of saving seeds from your pumpkins are numerous. Firstly, it’s an economical choice. Instead of buying new seeds each year, you can utilize the bounty from your own harvest. Secondly, when you save seeds from heirloom pumpkins, you preserve their unique genetic traits. This means you can grow the same beautiful Cinderella or the striking blue-grey Jarrahdale again. It’s a way to maintain specific characteristics like color, shape, and flavor. For those interested in exploring these unique varieties, our Heirloom Pumpkin Shirts collection celebrates these distinct beauties, offering a glimpse into the diverse world of pumpkins.
Saving seeds also allows you to adapt plants to your local conditions over time. Seeds saved from pumpkins that thrived in your garden are more likely to perform well in the future. It’s a deeply satisfying part of gardening, connecting you more intimately with your patch. For anyone who loves the idea of a bountiful garden, learning 10 heirloom pumpkin varieties every fall lover should know can inspire your next planting season.
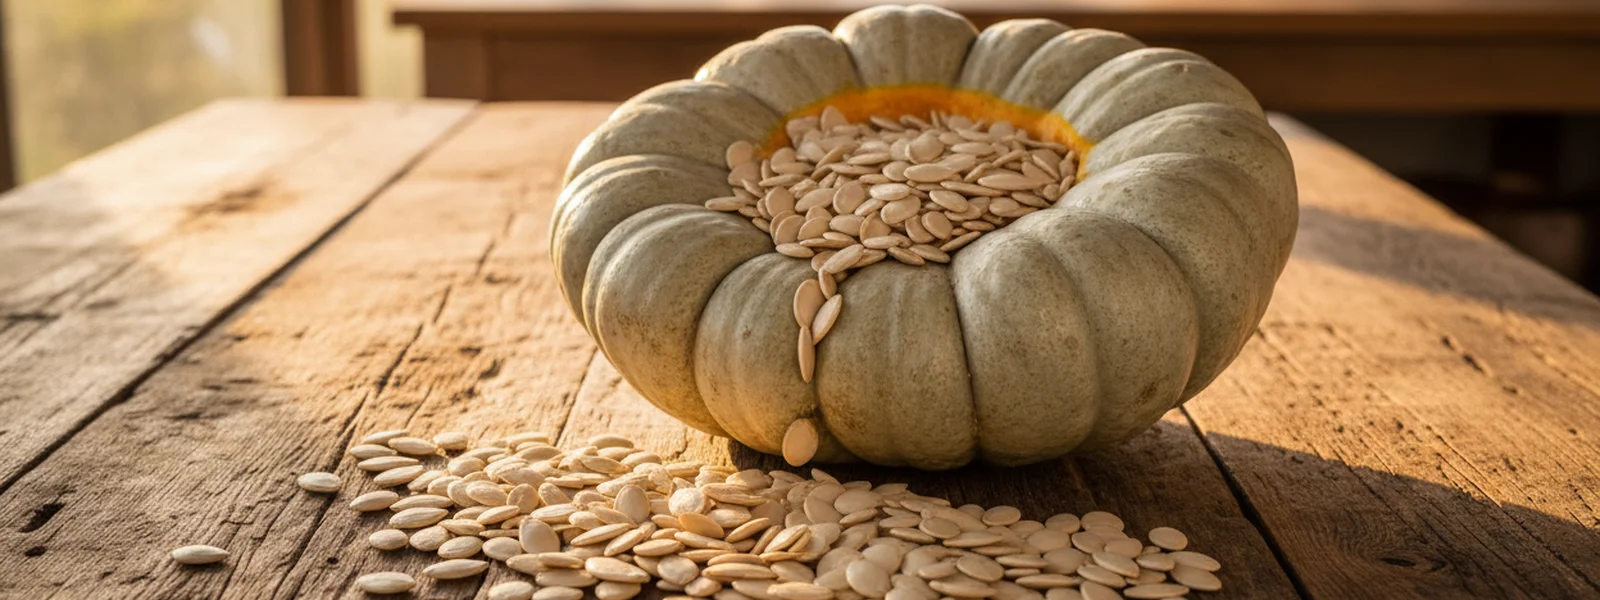
Step-by-Step: Harvesting and Cleaning Seeds
The best time to collect seeds is when you’re preparing your pumpkin for carving or cooking. Reach inside your chosen pumpkin and scoop out the stringy pulp and seeds. It might seem messy, but this is where the treasure lies.
1. Extract the Seeds: Start by pulling out as much of the pulp as you can by hand. Don't worry about getting every last bit; the cleaning process will handle the rest. For larger pumpkins, you might find quite a collection of seeds and stringy bits.
2. Rinse Thoroughly: Place the seeds and remaining pulp in a colander. Rinse them under cool running water, gently separating the seeds from the strings. Continue rinsing until the water runs clear and most of the pulp is gone. This is a crucial step for preventing mold during drying.
3. Separate Remaining Pulp: Some smaller bits of pulp might cling stubbornly. You can often pick these off by hand once the seeds are mostly clean, or you can float them in a bowl of water. The seeds will sink, and the lighter pulp will float to the top, making it easy to skim off.
4. Dry the Seeds: This is perhaps the most critical phase for long-term storage. Spread the cleaned seeds in a single layer on a paper towel, a baking sheet lined with parchment paper, or a clean kitchen towel. Ensure they are not overlapping, as this can lead to uneven drying and potential spoilage.
Place the seeds in a warm, dry, well-ventilated area. Avoid direct sunlight, which can cook the seeds. An ideal spot might be on a counter in a sunny room, or even in a dehydrator set to a low temperature (around 100-120°F or 38-49°C) if you have one. Drying can take anywhere from a few days to two weeks, depending on humidity and temperature. The seeds are ready when they are completely dry and brittle, snapping easily when bent.
Storing Your Saved Pumpkin Seeds
Once your seeds are thoroughly dried, it’s time to store them properly to maintain their viability for next year’s planting. The goal is to keep them dry and protected from pests and extreme temperatures.
- Containers: Small glass jars, airtight plastic containers, or even sturdy paper envelopes work well. If using envelopes, you might want to place them inside a larger airtight container for an extra layer of protection.
- Labeling: Don't forget to label each container with the variety of pumpkin (e.g., 'Cinderella,' 'Jack-o'-Lantern Mix') and the date you saved the seeds. This will be incredibly helpful when you're ready to plant.
- Storage Location: Store the labeled containers in a cool, dark, and dry place. A pantry, a cool cupboard, or a basement are good options. Avoid storing them in the refrigerator or freezer unless they are in a truly airtight container, as moisture can be an issue.
Properly stored pumpkin seeds can remain viable for several years, though their germination rate may decrease over time. It's always a good idea to test a few seeds before planting your entire season's worth.
Planting Your Saved Seeds: From Storage to Soil
When spring arrives and the danger of frost has passed, it’s time to plant your saved seeds. Pumpkin gardening tips often emphasize starting seeds indoors a few weeks before the last frost, or sowing them directly into the ground once the soil has warmed up sufficiently.
Direct Sowing: Choose a sunny spot with well-drained soil. Prepare the planting area by loosening the soil and adding some compost. Plant 2-3 seeds per hole, about 1 inch deep, and space the holes according to the specific variety's needs (pumpkins can get quite large!). Once the seedlings emerge and have a couple of true leaves, thin them to the strongest one or two plants per hole.
Starting Indoors: For a head start, you can sow seeds in biodegradable pots (like peat pots) about 2-3 weeks before your last expected frost. This minimizes transplant shock. Use a good quality seed-starting mix and keep the pots in a warm location. Once the seedlings are ready and the outdoor conditions are favorable, you can transplant the entire pot directly into the garden.
Caring for Seedlings: Regardless of how you start them, pumpkin plants appreciate consistent moisture and plenty of sunlight. Watch out for common pests and diseases, and be prepared to provide support for the vines as they grow. Growing pumpkins from your own saved stock is incredibly rewarding. It’s a connection to the earth and a celebration of the season, much like the joy we aim to capture with our Pumpkin Patch Shirts, perfect for your next harvest adventure.
The Joy of Growing Your Own
There’s a profound satisfaction that comes from nurturing a plant from a saved seed to a full-grown pumpkin. It’s a tangible link to the agricultural past and a sustainable practice for the future. Each pumpkin you grow from your own seeds is a testament to your connection with the natural world and the rhythm of the seasons. It’s a hobby that brings both delicious rewards and beautiful decorations.
Whether you’re carving a spooky face for Halloween or growing a Cinderella for a Thanksgiving centerpiece, the journey starts with a seed. And the best seeds are often the ones you saved yourself. For those who appreciate the unique beauty of these gourds, our Jack-o'-Lantern Shirts and Cute Pumpkin Shirts offer a way to carry that appreciation throughout the fall season. Why not start your own seed-saving tradition this year?

Published by Pumpkin Shirts
The pumpkin is the point.
Frequently Asked Questions
When is the best time to save pumpkin seeds?
The best time to save pumpkin seeds is when you are preparing your pumpkin for carving or cooking. Ensure you select seeds from a healthy, mature pumpkin, preferably an heirloom variety if you wish to preserve specific traits.
How do I properly clean pumpkin seeds for saving?
After extracting the seeds and pulp, rinse them thoroughly in a colander under cool water. Continue rinsing until the water runs clear and most of the pulp is removed. Floating the seeds in water can also help separate any remaining bits.
How long does it take for pumpkin seeds to dry?
Drying time varies depending on humidity and temperature, but it can take anywhere from a few days to two weeks. Spread the seeds in a single layer in a warm, dry, well-ventilated area. They are ready when they are brittle and snap easily.
What is the best way to store saved pumpkin seeds?
Store thoroughly dried seeds in an airtight container, such as a glass jar or plastic container, in a cool, dark, and dry place. Label the container with the pumpkin variety and the date saved.
Can I save seeds from any pumpkin?
It's best to save seeds from open-pollinated or heirloom pumpkins if you want to grow true-to-type plants next year. Seeds from hybrid pumpkins may not produce plants with the same characteristics.
How long are saved pumpkin seeds viable?
Properly stored pumpkin seeds can remain viable for several years, though their germination rate may decrease over time. It's a good practice to test a small batch for germination before planting your entire supply.
When should I plant my saved pumpkin seeds?
Plant your saved pumpkin seeds in the spring after the last frost and when the soil has warmed up. You can sow them directly into the garden or start them indoors a few weeks prior to transplanting.
First Look at New Pumpkin Designs
New illustrations, patch stories, and heirloom variety guides — straight to your inbox before anyone else sees them.